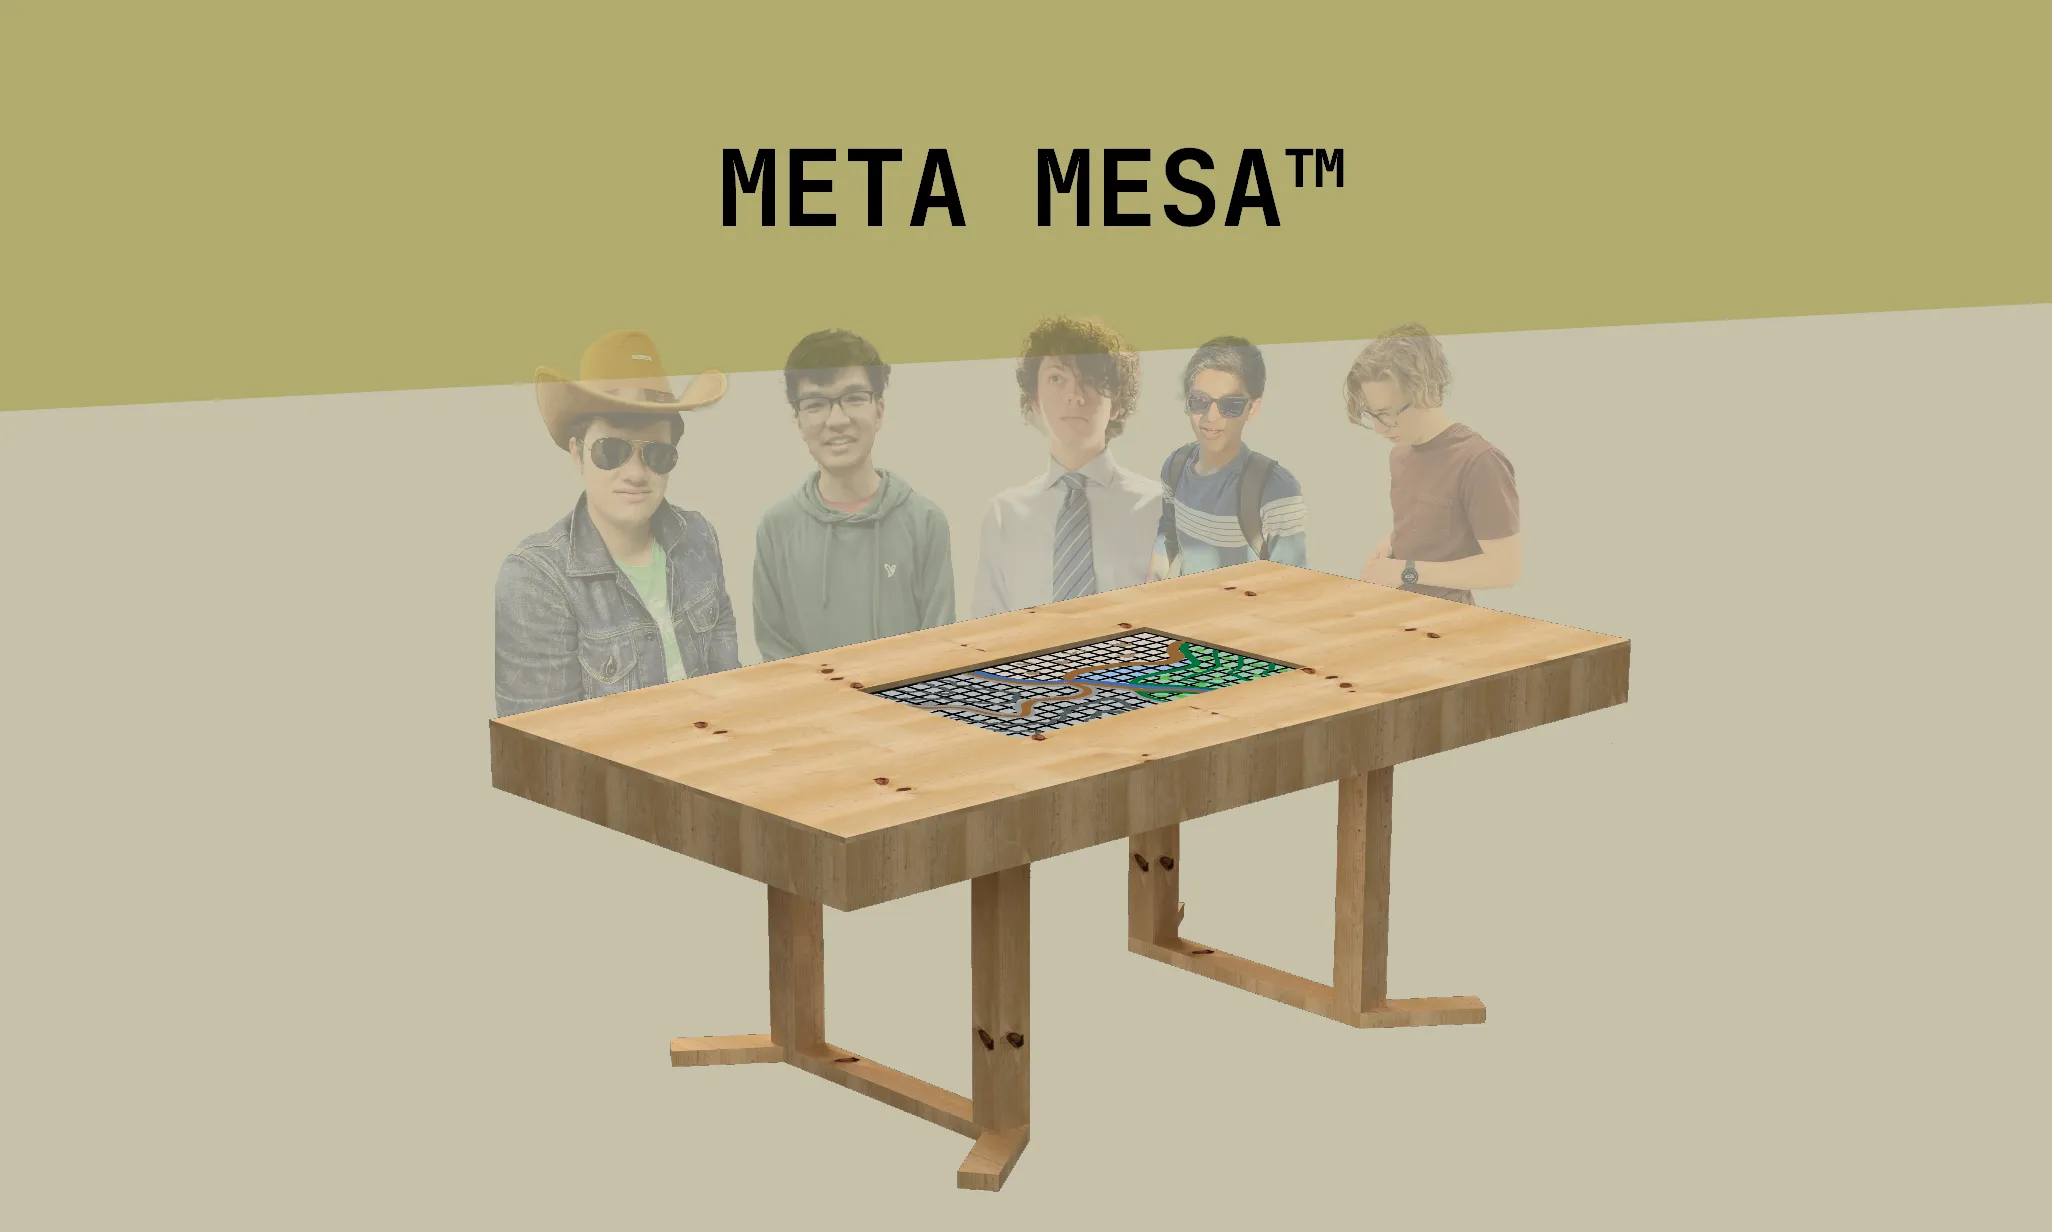
Meta Mesa: D&D Gaming Table with Embedded Digital Map
A portable gaming table with an embedded digital map and packs into an SUV trunk
This subject of this article occurred in Learn more about how I sort articles chronologically.
This project was my high school senior engineering project, where I wanted to try something new with mechanical design and woodworking. This article is adapted from my final design poster, which you can view here, and my weekly design journals that I submitted for the class.
Contents
Introduction
Dungeons and Dragons usually requires maps on the table. The game master frequently needs to get up and manipulate the map. It can be annoying to move the map when there are things on top, and it can sometimes be impossible to move it without disrupting the state of game characters sitting on the map.
The solution is to put a TV horizontally in a tabletop. My table lets a game master control what is displayed on the screen through a laptop. Then player miniatures and other game pieces go on top of the TV screen. This way, the game master can move and manipulate the map endlessly without disturbing the pieces on top.
The table must disassemble small enough to be transported in a car. This means the table top is designed to break into four sections and that the legs are removable.
Poster / Presentation
Mechanical Design
CAD
I designed the table using CAD in Fusion 360. I modeled the TV using real-world measurements, and then I modeled the table around it. I then added in the legs and other pieces, like adjustable TV supports.
TV Supports
I created these 3D-printable supports to hold the TV in place inside the table. They use two nuts and a bolt to allow for fine height adjustment of each corner of the TV by raising or lowering the nut.
Dimensions
Completed Version
The final table works at a basic level but could use some improvements. It meets the goals of portability, fitting in a car. It could benefit from some build quality improvements in a future version.
Software
For now, the most convenient software for the game master to use is the free and open source MapTool by RPTools. It allows for customization of maps and displaying most things that would need to be displayed.<
Design Process
Adapted from my weekly design journals.
Initial Ideation
Today I started working designing the basic table for my project. I focused first on the table legs. My idea is to have legs in the middle of the table, not on the edges, so that people can sit around the edges. I drew out a bunch of ideas on paper in class and for homework.
INSERT THREE PICTURES HERE OF THE OG SKETCHES AND CARDBOARD THREE LEGGED TABLE MODEL
I also would like them to be removable so that I can stow away the table when it is not in use. I like the curvy legs but I don’t know how I would make them. Next class I plan to start creating some cardboard model. One option is like the IKEA legs. They just screw in. Probably not the best because I don’t think they are that strong Hinge idea: legs fold on the bottom of the tabletop
Today I spent some time deciding on a good table size. I decided on 8’ x 4’ by placing it out on the ground with tape measures. Today I worked on new ideas for table legs and how they would fold/detach. After talking with Dave, I decided that a three leg design was probably not the best. If found this online as one possible folding option: I think that a design that detaches instead of folds will be easier to create and look better. I came up
Starting CAD
Parameterizing everything so it is hopefully easier to change in the future. I also made parameters for dimensional lumber sizes so I don’t accidentally screw something up. Today I worked more on the CAD. I first finished the leg design I was working on: Today I did more work on the table CAD. I sketched out an idea for inner supports of the table: Today I did more work with the CAD for my table. When I looked at what I had made last week, it looks like the table might be strong in certain directions but prone to twisting. I drew an idea for some diagonal support structures that could go in between the other beams: tv cross section For homework I worked on the table CAD some more to integrate these braces for the legs. I haven’t really thought about how this would come apart, but I guess that’s a problem for later 🙄.
Getting Help and Design Changes
In this class and for homework, I talked to Mike about how to best support the table. He suggested some coverings on all sides of the table legs that would brace them in all directions: Then I wanted to create a 6:1 scale model of the whole table out of cardboard. I put all the parts into Illustrator and cut them out of 1/4” cardboard on the laser cutter. (from last week)…when assembled, the leg panels on the sides are way too close to the person sitting there.
TV Supporting
Based on that side view, it shouldn’t be too difficult to create the supports for the TV. This will help me finish the CAD by creating supports. Today I 3D printed my TV model at scale so I could put it into my cardboard model. Dave suggested an idea like this that would be adjustable to level the TV once it was in place. CAD and printed. Had to make really thick
Next design pivot
Today I started by having a mild breakdown of not knowing what to do. Then Dave helped me and I started brainstorming new ways to go about the table so that it would fold and fit in a car.
First idea here is to have four parts that all hinge together and fold. Then two pieces and fold
Begin assembly
Today I started marking up wood to cut. I found this website that lets me input all my stock and needed cuts and then plans out the most efficient way for me to use my wood with the least waste. The online tool for cut optimizing was very helpful. I got all my pieces done and stacked from different stock and have just one long piece left over. It was a little tricky on some parts to keep the top face flat so that the plywood will sit right when finished. I will try to complete another frame next class. Then I’ll find some hinges and see if it folds up right! It seemed a little weird at this point. I wasn’t able to get every corner square. I kinda just kept going and pushing stuff and clamping it to see what would happen. It worked to some extent. I then had to leave it for the weekend and come back next week. (lots of warped shit) many clamps to fix attach top jigsaw then router to clean up First layout ont he floor! w/ tv
Second to Last design pivot
Then I talked to Mike about ideas for the rest of the table. He suggested bolts and wing nuts to attach the quadrants together. I decided that it would be best to do away with the hinges altogether and just attach the four pieces with bolts. He also suggested that I buy some pre-made folding legs or folding leg brackets. It would be easiest to create a second, small “table” that goes underneath and has the folding legs. This one would be small enough to transport in one piece. And then it would line up with the main tabletop that would sit on top. CADded it
Clampoed together and drilled holes I had to use this right angle drill bit to drill holes. Some of the sections were too close together to fit the whole drill with the bit. I had to use a smaller bit that fit in the right angle adapter and then take the pieces apart and re drill them with a bigger bit. wing nuts.
Last design pivot
At this point I also rethought my leg idea. I am no longer going to do the secondary table for support. I will stick with the four legs as I initially intended. I think this way it will look better, I already have the wood for it, and it will be easier and faster to create before the design fair. test fit and Then I turned it on and connected my laptop to put a map on it. I then got my picture for the design poster. It works just like I wanted! car test fit Through homework time I finished all four of the TV supports I need. I printed the main body parts with high infill and 8 perimeters. They are really strong even though they are just PLA. They have two nuts and the bolt spins within it. The bolts were a bit hard to turn on their own, so I designed these knobs to go on them to make them easier to turn. I ended up printing them out of nylon since it was already loaded into the MK2.5. They came out well! support finishing